
If you’ve ever dealt with a sewer line that keeps backing up for no obvious reason, there’s a good chance the real problem isn’t the pipe itself — it’s the slope. Getting the minimum sewer line slope right is one of those details that’s easy to overlook during installation but expensive to fix once the trench is backfilled and the concrete is poured over it.
This guide walks through what the plumbing codes actually require, why those numbers exist, how to calculate the right fall for your run, and how to set it out correctly the first time — so you’re not the person digging up a driveway six months from now.
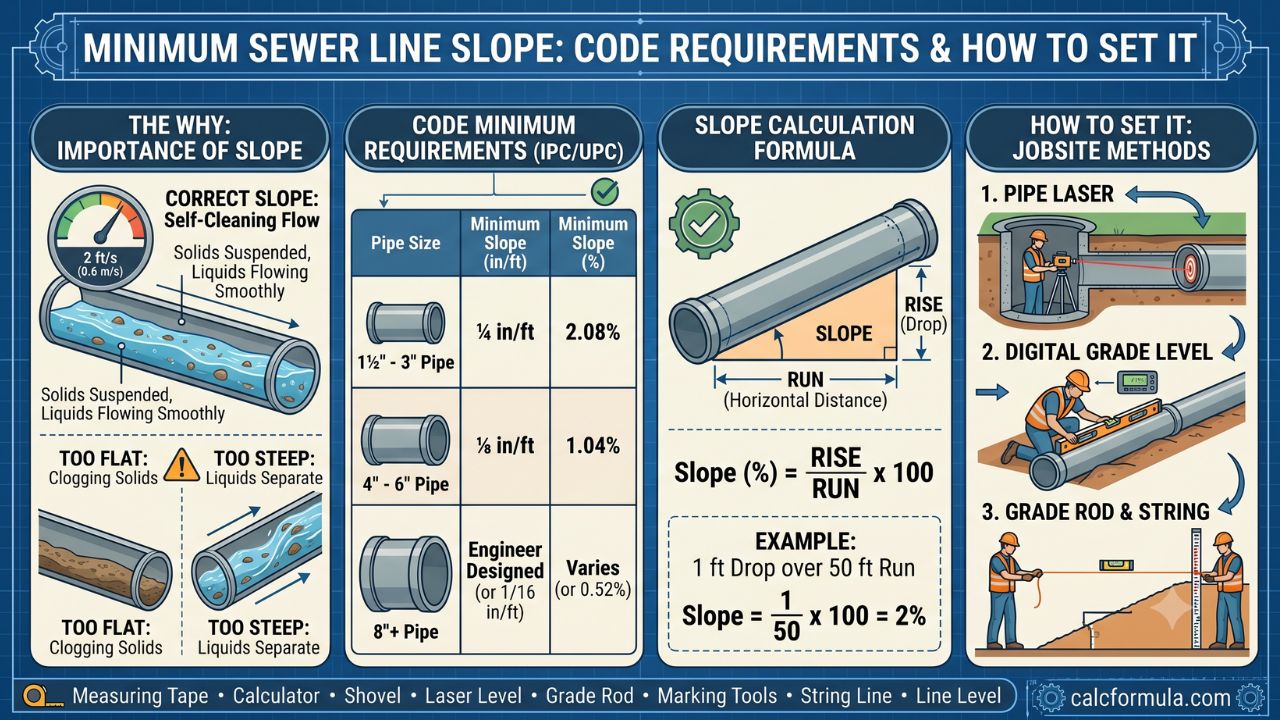
What “Sewer Line Slope” Actually Means
Slope (sometimes called “fall” or “grade”) is simply how much a pipe drops in elevation over a given horizontal distance. It’s usually expressed two ways:
- Inches per foot — the most common way plumbers talk about it on site (e.g., “1/4 inch per foot”)
- Percentage — the way it’s often written in code books and engineering drawings (e.g., “2%”)
A sewer line relies entirely on gravity to move waste and wastewater from the building to the public sewer main, a septic tank, or a lateral connection. There’s no pump doing the work in a standard gravity sewer, which means the slope has to be just right — enough to keep things moving, but not so steep that it causes its own problems (more on that below).
Minimum Sewer Line Slope Requirements by Pipe Size
Most U.S. plumbing codes — including the International Plumbing Code (IPC) and Uniform Plumbing Code (UPC), which form the basis for most local and state codes — set minimum slope requirements based on pipe diameter. The general framework looks like this:
| Pipe Diameter | Minimum Slope | Approximate Percentage |
|---|---|---|
| 2½ inches or smaller | 1/4 inch per foot | ~2.1% |
| 3 to 6 inches | 1/8 inch per foot | ~1.0% |
| 8 inches or larger | 1/16 inch per foot | ~0.5% |
For a typical residential building sewer — usually a 4-inch pipe — that means a minimum slope of 1/8 inch per foot (about 1%). That said, many plumbers and inspectors prefer to target 1/4 inch per foot (about 2%) on 4-inch residential lines whenever the trench depth allows it, because it gives a bit of a safety margin and improves how well the line carries solids.
A few important notes here:
- These figures reflect the general framework used by major model codes. Some jurisdictions adopt the IPC, others the UPC, and many add their own local amendments — especially for connections to a public sewer main.
- Always confirm the exact requirement with your local building department before finalizing a design. Code minimums are a floor, not a recommendation, and local conditions (frost depth, main invert elevation, soil type) often push the actual design slope higher.
Why the Minimum Slope Requirement Exists
The minimum slope isn’t an arbitrary number — it’s tied to something called self-cleansing velocity. The idea is that wastewater moving through the pipe needs to reach roughly 2 feet per second to carry solids along with it instead of letting them settle out.
If a sewer line is laid too flat:
- Liquid moves slowly, and solids drop out of suspension before they reach the main.
- Those solids accumulate along the bottom of the pipe, gradually narrowing the effective diameter.
- Over time, this leads to slow drains, recurring clogs, and eventually a full blockage or backup — often right at the lowest point of the run, which tends to be the hardest to access.
This is the most common reason a newly installed sewer line starts having problems within the first year or two. The pipe itself is fine; it just doesn’t have enough fall to keep things moving the way it’s supposed to.
Can a Sewer Line Have Too Much Slope?
Yes — and this one surprises a lot of people, because the instinct is “more slope equals better drainage.” Up to a point, that’s true. But on small-diameter pipe, an excessively steep slope can actually cause the same kind of problem as a flat one, just from the opposite direction.
Here’s what happens: on a very steep run, liquid waste accelerates and rushes ahead of solid waste, essentially leaving the solids behind to dry out and stick to the pipe walls. This is sometimes called the “waterfall effect,” and it’s a known issue in plumbing design.
As a general rule of thumb, many designers try to avoid exceeding about 1/2 inch per foot (roughly 4%) on 4-inch residential lines unless there’s no practical alternative. For longer runs with significant elevation drops, the better solution is usually a series of more gradual slopes with drop structures or manholes, rather than one continuously steep run.
How to Calculate the Slope for Your Sewer Line
The math itself is straightforward — it’s the same basic relationship used for ramps, roofs, and roads:
Slope (in inches per foot) = Total Drop (in inches) ÷ Total Run (in feet)
Or, if you’re working in percentage:
Slope (%) = (Drop ÷ Run) × 100, with both measurements in the same unit (e.g., both in feet, or both in inches)
A Quick Example
Say you’re running a 4-inch building sewer 60 feet from the cleanout to the connection point, and your local code requires a minimum of 1/8 inch per foot.
Total drop required = 60 ft × 0.125 in/ft = 7.5 inches
If you instead aim for the more comfortable 1/4 inch per foot target:
Total drop required = 60 ft × 0.25 in/ft = 15 inches
That extra 7.5 inches of drop over the same run might sound small, but it can make a real difference in how the line performs over the years — assuming your trench depth and connection elevation can accommodate it.
Rather than running these numbers by hand every time, it’s worth bookmarking a Sewer Line Slope Calculator. Plug in your pipe diameter, run length, and either your code minimum or target slope, and it’ll give you the exact drop you need — handy for double-checking your math before you ever pick up a shovel.
Setting Out the Slope: A Step-by-Step Approach
Getting the slope right on paper is one thing. Getting it right in the trench, with dirt, rocks, and an uneven base to deal with, is where most slope problems actually happen. Here’s a practical sequence that works for most residential and light commercial sewer runs.
1. Confirm the Pipe Size and Code Minimum
Start with the diameter of pipe you’re installing and pull the matching minimum slope from your local code. If there’s any ambiguity, call your local building or plumbing inspector — it’s a five-minute phone call that can save you a failed inspection later.
2. Measure the Total Run
Measure the horizontal distance from the starting point (typically a cleanout near the building) to the ending point (the sewer main connection, septic tank inlet, or lateral). Be precise here — even a few feet of error over a long run changes your required drop noticeably.
3. Calculate the Required Drop
Use the formula above, or run the numbers through a Pipe Slope Calculator to confirm. This is also a good point to sanity-check that your existing invert elevations — the depth at the start and the depth at the connection point — actually allow for that much drop. If they don’t, you may need to adjust the trench depth at the building end, or reconsider the routing.
4. Set Grade Stakes Along the Trench
Using a laser level, builder’s level, or a string line with a line level, set grade stakes at regular intervals — every 10 feet is a common spacing for residential runs. Mark each stake with the target invert elevation for that point in the run, calculated from your overall slope.
5. Prepare a Stable Bedding Base
Pipe slope is only as good as what’s underneath it. Compact the bedding material in even layers and avoid leaving soft spots or loose fill, especially under joints. A pipe that’s perfectly sloped when it’s laid but settles unevenly afterward will develop the exact bellies and low spots that cause clogs.
6. Lay the Pipe and Check Grade at Multiple Points
As you lay each section, check the elevation against your grade stakes — not just at the start and end, but at multiple points along the run. A pipe can have the correct average slope and still have a dip or hump in the middle that causes problems.
7. Verify Before Backfilling
This is the step people skip when they’re in a hurry, and it’s the one that matters most. Before you backfill, run a final check on the overall fall using a Drainage Fall Calculator — confirm that the actual measured drop over the actual measured run still meets or exceeds your target. Once the trench is filled in, fixing a slope problem means digging it all back up.
Common Mistakes That Throw Off Sewer Line Slope
A few issues come up again and again on real job sites:
- Bellied pipe from soft or uneven bedding, creating a low spot where waste pools and solids settle
- Miscalculated trench depth at the building connection, leaving too little fall to work with by the time you reach the main
- Fittings and direction changes that quietly add or remove elevation without anyone accounting for it
- Frontloading the slope — taking most of the drop near the start of the run and leaving the back half nearly flat
- Eyeballing it instead of using grade stakes, a level, and a calculator to confirm the numbers
Any one of these can take a line that was designed correctly and turn it into one that doesn’t perform the way it should — even though, on paper, everything checks out.
Tools Worth Keeping Handy
If you’re planning, installing, or inspecting a sewer line, these three calculators cover most of what you’ll need at different stages of the job:
- Sewer Line Slope Calculator — quickly find the required drop for a given run length and target slope, or check whether an existing line meets code minimums
- Pipe Slope Calculator — useful for any drainage pipe, not just sewer lines, when you need to convert between inches per foot and percentage
- Drainage Fall Calculator — handy for verifying total fall across longer or multi-section runs before backfilling
Frequently Asked Questions
What is the minimum slope for a 4-inch sewer line? Under most model plumbing codes, a 4-inch sewer line falls into the 3-to-6-inch category, which requires a minimum slope of 1/8 inch per foot (about 1%). Many plumbers prefer to target 1/4 inch per foot (about 2%) when trench depth allows, for better self-cleansing performance.
How do I know if my existing sewer line has enough slope? A plumber can check this with a level run through the line during a camera inspection, or by measuring the invert elevations at both ends and dividing by the run length. Recurring slow drains or backups, especially after heavy use, are often a sign the slope is below minimum.
What happens if a sewer line is laid too flat? Wastewater moves too slowly to carry solids along with it, so solids settle and accumulate inside the pipe. Over time this narrows the effective diameter and leads to recurring clogs and backups, even if the pipe itself is in good condition.
Is there a maximum slope for a sewer line? Most codes don’t specify a hard maximum, but excessively steep slopes on small-diameter pipe can cause liquid to outrun solid waste, leaving solids behind. As a practical guideline, many designers avoid exceeding about 1/2 inch per foot on 4-inch residential lines unless a stepped or manhole-based design is used.
Final Thoughts
The minimum sewer line slope requirements in the plumbing code aren’t just a box to check for an inspection — they’re based on decades of real-world experience with what happens when gravity drainage doesn’t have enough fall to work with. Getting the slope right means measuring carefully, calculating the required drop before you dig, checking grade at multiple points as you go, and verifying everything one more time before backfill.
It’s a small amount of extra effort during installation compared to the cost — in time, money, and mess — of digging up a sewer line that was laid a fraction of an inch too flat.